1 Sidetone Level Adjustment Mod
Parts list:
1000 ohm PC board potentiometer, qty. 1.
Instructions:
* Remove R35 (1000 ohms) near C49, the large electrolytic.
* Find C46 which is near C49, unsolder and lift the leg of C46 which nearest point "W" and carefully twist the body of the capacitor toward the rear of the board.
* Drill a hole in the ground copper trace near C46 to accommodate the leg of a 1000 ohm pot
* Solder one leg of the pot into this hole
* Solder the other leg of the pot into the hole vacated by the lead of C46
* Connect a wire between the leg of C46 and the center (wiper) lead of the pot
*Apply power and adjust the pot for your preferred sidetone level.
(From Ham Radio Magazine, Dec. 74.)
Parts List:
1 ea. 2N2222 or equivalent transistor, qty. 1.
1 ea. 270 kohm 1/4 w. resistor, qty. 1. Instructions:
* Remove D2, also near C49.
* Drill a hole in the ground foil near point "X"
* Remove jumper from point "U" to point "X
* Drill a hole in the foil land between RL1, pin 4 and Q9, collector
* Connect one end of a 270 kohm resistor in this hole. Position the body vertically
* Connect the collector of a 2N2222 or equivalent to point "X
* Connect a wire from the off-board end of the 270 kohm resistor to the base of the 2N2222
* Connect the emitter of the 2N2222 to ground in the hole drilled in step 2
Parts list:
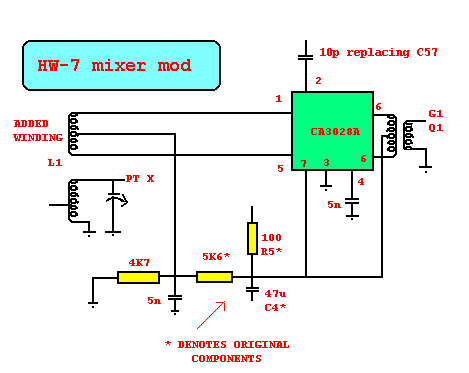
CA3028A mixer IC, qty. 1
Audio transformer, push-pull to single ended, transistor interstage or audio output, qty. 1
0.1 ufd. disk ceramic capacitor, qty.
0.01 ufd. disk ceramic capacitor, qty. 1
0.005 ufd. disk ceramic capacitor, qty. 1
4700 ohm 1/4 w. resistor, qty. 1
5600 ohm 1/4 w. resistor, qty. 1
Instructions
* Remove C57, the 1.5 pfd. capacitor that couples the oscillator signal to Q1.
* Cut the foil land between L1, pin 1 and Q1, G1.
* Drill a hole in the land on the Q1 side of the cut.
* Drill a hole in the ground foil near the C57-Q1, G2 hole.
* Install a 0.1 ufd. capacitor between the C57-Q1, G2 hole and the nearby ground hole, solder both leads.
* Drill three (3) holes in the ground foil near L1 and C2.
* Carefully remove L1, wind six (6) turns, center tapped onto the L1 toroid and re-install.
* Drill a hole in the +13 vdc foil near L3, the 40 m. doubler coil.
* Drill a hole in the ground foil nearby the previous hole.
* Run a 5600 ohm resistor from the +13 vdc connection to a 4700 ohm resistor bypassed with a 0.005 ufd. capacitor connected to the ground. This junction is left floating above the circuit board, so try to make the connections as short and rigid as possible.
* Mount the audio transformer on the chassis, Heathkit part #200-638.
* Connect the floating junction in step 10 above to the center tap of the additional winding on L1.
* Prepare the CA3028A to be installed "dead bug fashion" over the antenna coax that is connected between points "A"-"B" and "Q"-"S"
Use double stick tape or put electrical tape on the coax and use a dab of glue to hold the IC over the cable, just in front of L1 with the case tab oriented toward point "A" on the circuit board.
* Connect the ends of the additional winding on L1 to pins 1 and 5 of the CA3028A.
* Connect pin 7 of the CA3028A to the center tap of the audio transformer.
* Connect the ends of the center tapped winding of the audio transformer to pins 6 and 8 of the CA3028A.
* Connect the output side of the transformer between ground and the hole drilled in step 3 above in the land that connects to Q1, G1.
* Connect pin 3 of the CA3028A to ground
* Connect pin 4 of the CA3028A via a 0.01 ufd. capacitor to ground.
* Connect pin 2 of the CA3028A to the VFO side of the holes that originally contained C57.
*Carefully recheck all the connections, apply power and test that signals are heard by the receiver. It will be more sensitive than before and there should be not detection of SW AM BC stations unless they are directly tuned in.
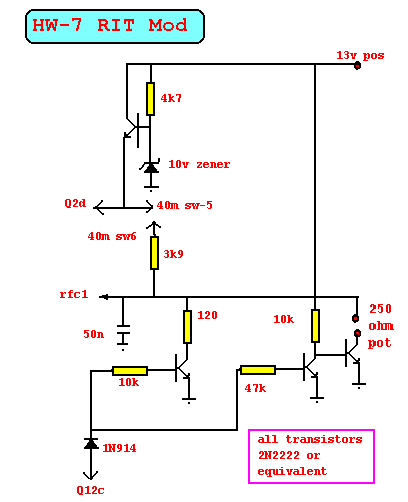
Parts list:
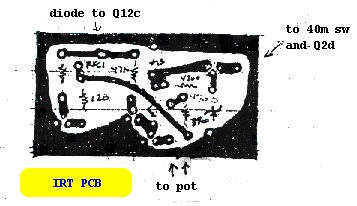
PC board, etched and drill according to the diagram.
10 v. zener diode, qty. 1.
1N914 or equivalent diode, qty. 1.
2N2222 or equivalent transistor, qty. 4.
250 ohm panel mount potentiometer, qty. 1.
120 ohm 1/4 w. resistor, qty. 1.
3900 ohm 1/4 w. resistor, qty. 1.
4700 ohm 1/4 w. resistor, qty. 1.
10 k ohm 1/4 w. resistor, qty. 2.
47 kohm 1/4 w. resistor, qty. 1.
0.05 ufd. disk ceramic capacitor, qty. 1.
Instructions:
* Etch, clean and carefully inspect the PC board to conform to the diagram.
* Put in the four transistors, 2N2222 or equiv., and solder
the 12 leads. * Put in the two 10 kohm resistors, solder the four leads.
* Put in the 47 kohm, 3900, 4700 and 120 ohm resistors, solder the 8 leads.
* Put in the zener, being sure to observe the polarity, and the 1N914, being sure the banded end is correctly oriented. Solder the four leads.
* Check the solder joints for cold solder joints or solder bridges. Carefully re-check that the parts are installed in the correct places and oriented correctly in the cases of the semi-conductor parts.
* Find the 40 m. bandswitch, check the manual and identify pins 5 and 6. Solder two insulated hook-up wires to pins 5 and 6. These should be about 3" long.
* Unsolder the ground end of RFC-1 from the main system board.
* Drill a hole in an insulated area just toward the bandswitches from the original hole and insert the lead from RFC-1, one lead of the 0.05 ufd. disk capacitor and a wire lead of about 5 inches and solder all three together under the board.
* Solder the other lead of the 0.05 ufd. capacitor in the ground hole just vacated by the lead of RFC-1.
*Drill a hole in the ground foil nearby and solder in a wire lead of about 5 inches.
* Remove R25.
* Solder wire leads of about 5 inches into both holes vacated by R25.
* Drill a hole between R36 and R37 in the trace going to Q12-C and solder in a wire of about 4 inches. Now there should be a total of seven leads connected to the main board which will connect to the new PC board.
* Remove and save the screw through the front panel and chassis near the meter.
*Enlarge the holes in the panel and the chassis to mount the 250 ohm pot.
* Solder two leads of about 3 inches to the wiper and counterclockwise terminal of the pot.
*Mount the pot in the front panel and chassis. Carefully center the shaft in its rotation and take care not to disturb the shaft until after the alignment.
* Solder the nine leads from the pot and main board to the new PC board, checking carefully to make sure you have the connections correct.
* Position the new PC board over the band switches making sure you clear the final heat sinks, the case of L12 and the final tuning capacitor. Mount an L-bracket to the PC board and mark the chassis and drill a hole through the chassis and front panel and use the screw removed in step 15 above to mount the L-bracket.
* Align the VFO according to the instructions in the manual.
* Attach a knob to the shaft of the new pot with the indicator vertical for zero-beat with the transmitted frequency. *Using a calibrated receiver as in the alignment, mark each kHz. above and below zero-beat as an aid in using the RIT control.
I added a coaxial DC connector in parallel with the Molex type connector on the back panel to allow easy use of DC adapters to power the HW-7. I put a rectifier diode with the cathode on the +13 VDC and the anode to ground to prevent reversed DC polarity from damaging the rig. I also put another 0.1 ufd. disk ceramic capacitor across the DC input connector for extra bypassing.
I changed the antenna jack from an RCA audio jack to a BNC connector.
I put a ferrite bead in the gate lead of Q2 to stop a parasitic oscillation at about 125 Mhz. I also put the same type ferrite bead in the emitter lead of Q4 as an extra precaution.
I put a 0.1 ufd. disk ceramic capacitor in parallel wtih C13. I changed C41 to 0.001 ufd and R41 to 10 kohms based on suggestions in ham magazines at the time I was working on it.
I added a large RFC of indeterminate value across the antenna jack to prevent static build up on the antenna from damaging the front end. The value is not important as long as the reactance at 40 m. is high enough not to affect the loading.
My thanks to Jerry W1UI for these useful notes (G3YCC)