Setting Folders and Filters (Message Rules) in
By Dan W. Dooley WB5TKA
NOTE: These procedures apply directly to Outlook 2000, but the steps should be similar enough to their equivalents in Outlook 98 to allow the reader to achieve the same results.
These initial paragraphs are not the procedures for setting up folders and filters within Microsoft Outlook, but are necessary for setting the stage, so to speak. I'll get to the meat of the topic shortly. Bear with me.... Since it's hard to follow a sheet of instructions unless you can actually view the process as you go, you may want to print this out beforehand and launch Outlook to view the steps as you read. Also please note that this document is not intended as a guide or a tutorial on using the sundry features of Outlook - only those functions which apply directly to the creation of folders (topic groups) and message filters.
Before we create new folders, let's make sure you can see the folders already present. To display the Folder List, go to menu View and make sure that "Folder List" is checked. Checking too many items will clutter up the screen. For example, showing the Outlook Bar adds another column of icons and Shortcuts to the screen. The more columns on the screen, the less space there will be to view your messages. If however, you are using the other functions of Outlook (scheduling, calendar, notes, etc.), you will need this bar. I'd recommend these boxes be checked: "Folder List", "Status Bar", and "Toolbars | Standard".
Microsoft Outlook 2000
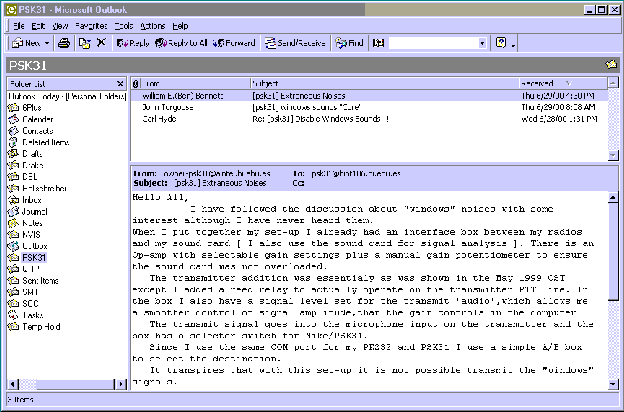
Figure 1
Your screen should look at least similar to Figure1. If you're looking at the Folder List in the left column, you will see a listing of folders similar to what you would see in the left pane of Windows Explorer. You've never seen that? Check it out some time.
So far, the layout is conducive to setting up subject folders and creating filters. One more thing. Go to menu Tools | Options. On the Other tab, click the Advance Options button (Figure 2). Under the General settings heading, make sure Inbox is displayed in the box by "Startup in this folder:" This insures that the default view of messages is your Inbox. This is of course where all default (unfiltered or un-redirected) messages appear. Click OK.
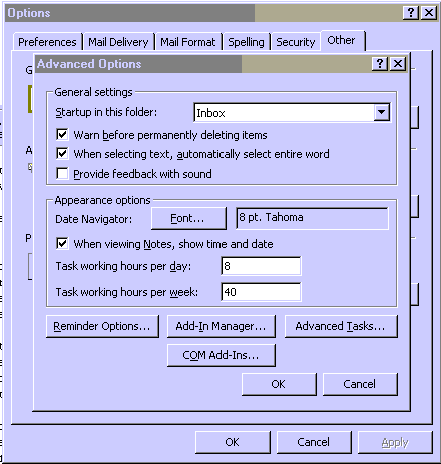
Figure 2
To actually create a new folder, do the following:
- Highlight "Outlook Today" in the Folder List.
- Right click the mouse and select from the resultant menu - "New Folder." A window like Figure 3 opens.
- Name your folder as desired. I've named folders for QRP, PSK31, SOC, etc. Once named, it will be added to the list of folders. Simple enough so far?
- Repeat this process until you have all of your needed folders created.
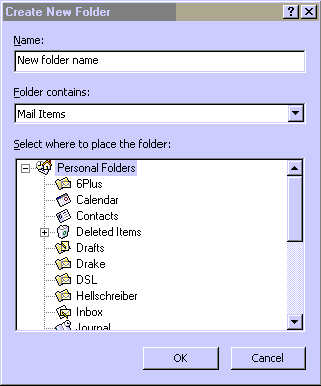
Figure 3
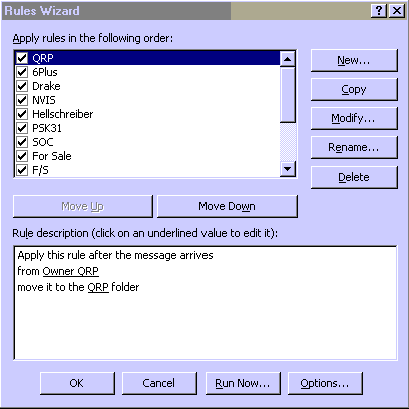
Figure 4
1. Go to menu Tools | Rules Wizard. You will see a window like Figure 4. 2. Click on the "New" button. Here you will see two windows (Figure 5). The top window offers you several possible "conditions" for your rule. Make sure the top line ("Check messages when they arrive") is highlighted. The bottom window describes the condition selected in the top window. 3. Click the Next> button.
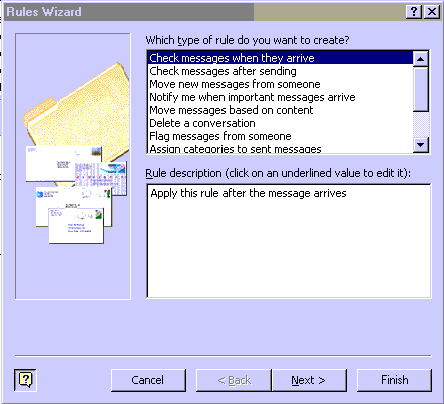
Figure 5
The next window (Figure 6) lets you select the condition for your rule, and what you want the rule to do when a message meeting the condition is received.
For example, when I set up a rule to filter all QRP related messages to my QRP folder, I selected in the top window the condition "From people or distribution list." In the lower window, I clicked on people or distribution list. Click the Next> button. The next window (Figure 7) shows a list of entries from my Address List. I can select one of them. The next window looks like Figure 8. Click the Next> button.
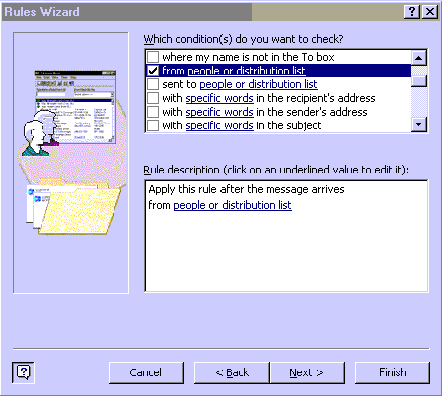
Figure 6
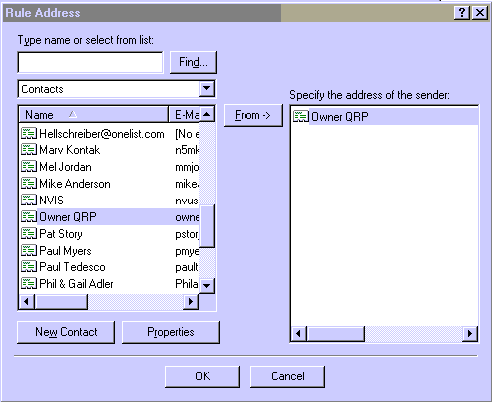
Figure 7
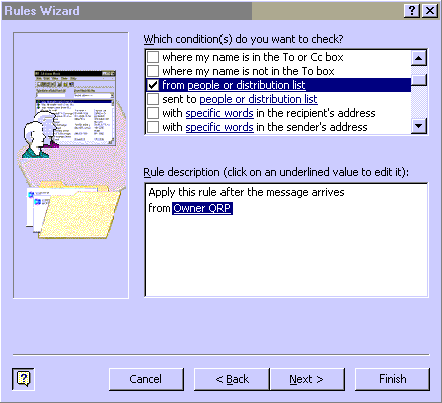
Figure 8
The next step is to select the specified folder to send messages from the QRP list to.
- Click on the underlined word "specified".
- Another window opens (Figure 10) showing the list of folders. If all of your folders do not display and there is a "+" in the small box before "Personal Folders", click on the "+" to expand and show your previously created folders.
- Select the desired folder (QRP in this example) and click on OK.
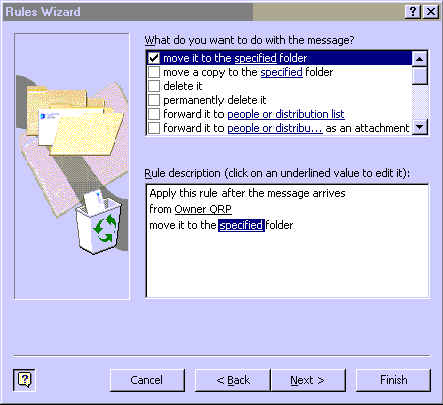
Figure 9
4. The word "specified" as shown in Figure 9 now reads "QRP."
5. Click Next.
The next window to be displayed offers a list of possible exceptions to your rule. In general, none will apply, so click on the Finish button. You will be returned to the Rules list window as in Figure 4. Here you can rename the rule and / or select its position or order within the list by moving it up or down in the list.
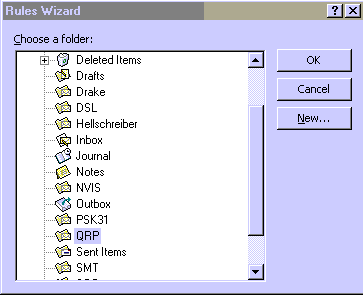
Figure 10
Let's create another rule. This time based on content in the Subject line of the message. Let's assume for the PSK31 list.
- Click on the New button. Find the condition specified in Figure 11.

Figure 11
2. Click on specific words in the lower window.
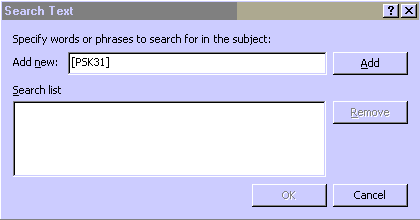
Figure 12
3. Type in the Add new box: "[PSK31]", without the quotes. 4. Click on Add and then OK. Now specific words is replaced with [PSK31]. 5. Click Next.
As in the previous example, the next step is to select which folder messages with "[PSK31]" will be placed in. The next screen will look like Figure 9. From this point on, follow the procedures outlined in the previous illustrations.
6. Just like in the previous example select the desired folder - in this case one created earlier called PSK31 and then click OK.
If you find that you've created a rule and you have created no folder to send messages to which fit the rule, you can create a new folder while in step 6 above.
So, why did I use the format [PSK31] above rather than simply the word "PSK31"? This specifies all messages coming from the PSK31 list. If you want to send all messages with the word PSK31 appearing anywhere in the Subject line, you can create a rule which will do so by eliminating the "[ ]". This rule would send any message containing that text in the Subject line into the PSK31 folder. You may want to create more than one rule to cover such needs. Many lists will prefix the Subject line with the name of the list enclosed in brackets.
I have created rules to handle what I consider junk mail as well. Some of it is truly junk and some is simply on issues that I'm not interested in and would rather not clutter my mailbox with. In the truly junk category, I created a rule to filter out messages with "International Drivers License" in the subject line, and another one for "Want to be a millionaire". These, I chose to "Delete from the server" as the Action. Additional rules to cover such Subject line content as: "FS:", "F.S.", "F/S", "For Sale", etc., cause such messages to be sent to the Deleted Items folder. There are a heck of a lot of items being offered for sale on the lists and also the WTBs (Wanted To Buy) and though of interest to some, I'm not in a buying mode now, so have no reason to see them. That's the beauty of the filters. You can create them for just about any situation you want, and once created you can actually turn them off individually if you like. Turning a filter off does not eliminate it.
As is the case with practically all Windows applications, there is generally more than one way to perform a particular function. There may be more than one way to bring up a particular options box, or to launch the Rules Wizard, for example. I did not try to outline them all here, and my method of launching a particular function may vary from yours. The end result will be the same.
I hope that this document has at least pointed you in the right direction for creating and using message rules. You see, it is easy!
| Return to QRP | Comments for Dan |